What is Oracle JET?
Before discussing how to install the Oracle JET tooling, for anyone not familiar with Oracle JET let's take a quick recap.

At its simplest: Oracle JET is a JavaScript toolkit designed to allow you to build client-side applications for both web and hybrid mobile applications too, using a combination of HTML5, CSS3 and JavaScript. It harnesses a number of modern open-source libraries and frameworks including RequireJS, Knockout, jQuery, and Cordova to build apps. In addition, JET extends upon these by providing a rich UI component set including data visualization components, with built-in accessibility and support for internationalization, web and mobile app templates, and command line tooling.
How to Install Oracle JET for Web or Hybrid - Mobile Application Development
From a developer's perspective looking to start out with Oracle JET by simply installing it, it's useful to explain that Oracle JET is logically split into tooling, that is the code libraries, command line scripts & utilities you will use to build your JET app, and the actual Oracle JET runtime which is the HTML, JavaScript and CSS that runs in the browser or mobile app.
In developing pure web applications (I hope to cover hybrid-mobile apps in another article) using Oracle JET, JET uses several well-known & popular Open Source packages:
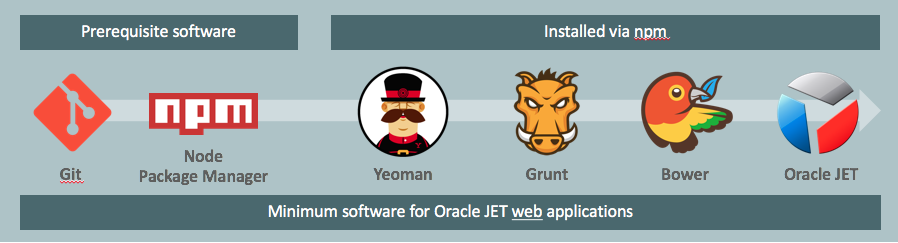
- NodeJS's Node Package Manager – used to install the other developer packages
- Git – in conjunction with Github provides access to the source for the other packages
- Yeoman – a web application scaffold tool for creating the shell of each JET app
- Grunt – akin to make files of old, used to run tasks to build and run JET apps
- Bower – separate to npm designed to download front-end runtime artefacts
- Oracle JET – the JET tooling and runtime that uses ND extends the other tooling
To install the
prerequisite packages:
Install
Git on your development machine.
From a web browser, download Git, selecting the version and instructions appropriate for your
OS.
Note:
If you’re installing
onto a Windows machine, install as Administrator and select the indicated
options in the following dialogs:
- In
the Adjusting your PATH environment dialog, choose Use Git from
the Windows Command Prompt.
- In the Configuring the terminal emulator to use with Git Bash dialog, choose Use Windows’ default console window.
- Install Node.js
- Install
the Tooling Packages
- Install Yeoman:
npm install -g yo - Install Grunt:
npm install -g grunt-cli - Install Bower:
npm install -g bower
Note:
After installing Bower to configure a proxy server, you must add the proxy definitions to the .bowerrc file (C:\Users\ansh) in your home directory. For example:
{
  ...
  "proxy": "http-proxy-server-URL:port-number",
  "https-proxy": "https-proxy-server-URL:port-number",
  ...
}
Install Yeoman, Grunt , Bower all together
npm -g install yo bower grunt-cli
Install the Oracle JET Yeoman Generator
npm -g
install generator-oraclejet
If
you use a proxy server, configure HTTP_PROXY and HTTPS_PROXY environment variables.
The process to set the environment variables depends upon
your development environment:
npm config set proxy http-proxy-server-URL:proxy-port
npm config set https-proxy http://my.proxyserver.com:80
git config --global http.proxy http://my.proxyserver.com:80
git config --global https.proxy http://my.proxyserver.com:80
Create Web Application
After
installing the Oracle JET Yeoman generator, you can create a new project with:
yo oraclejet <project name>
--template=navdrawer
yo oraclejet Ansh_Jet --template=navdrawer
Run Web Application

Run Web Application
Once
your project has been created, you can serve it by running:
cd <project name>
grunt build
grunt serve
grunt build
grunt serve
And after a second or so you should see the running app built upon the template "navbar" shell in your default browser:
Create Mobile Application
Create
a mobile application or take your JET based application to a mobile device:
npm -g install cordova
yo oraclejet:hybrid <project name> --platforms=ios|android
yo oraclejet:hybrid <project name> --platforms=ios|android
yo oraclejet:hybrid Ansh_Jet --platforms=android
Run Mobile Application
grunt build:dev --platform=android
grunt serve:dev --platform=android --livereload=true
Command
|
Description
|
grunt serve --platform=android --web=true
|
Launches the
application in the default local browser using the Alta Android theme.
|
grunt serve --platform=ios
|
Launches the
application in the iOS Simulator using the Alta iOS theme.
|
grunt serve --platform=android --destination=emulator-name
|
Launches the
application in the specified emulator. For example, use Nexus7 to specify an AVD that you
named Nexus7. The emulator name is case-sensitive.
|
grunt serve --platform=android
--destination=device
|
Launches the
application in an attached mobile device.
|


No comments:
Post a Comment